Starting an ecommerce store online can seem like a daunting task, especially when we consider the long list of features one expects from an online store. The WooCommerce store solves this problem effortlessly. You can easily get all the features associated with e-commerce stores, such as coupons, categories, sorting, and so on.
The best part? You’re not required to write a single line of code to build an online store with WooCommerce. It can be installed like a simple plugin on your WordPress site and all your store’s eCommerce features will immediately come to life.
As smartphone adoption has grown, e-commerce has shifted gears as well. Shoppers now prefer mobile apps for shopping for mobile websites. Compared to websites, apps are more easily accessible on mobile devices and load much faster.
This means even WooCommerce store owners need to consider the possibility of creating a shopping app for their business. Thanks to no-code development tools like AppMySite, this possibility is not a long shot.
DIY app-making tools make it incredibly easy to make mobile apps without coding. With a platform like AppMySite, you can even convert your WooCommerce store to a mobile app.
Let’s see how this process works.
Step 1: Design your WooCommerce app
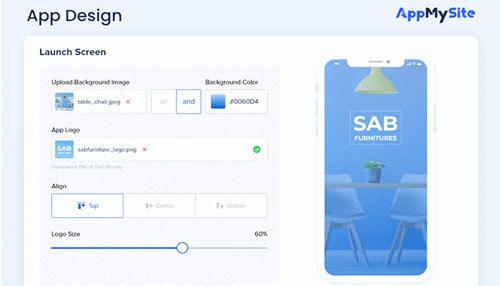
The first step is designing your WooCommerce app. Once your sign up for an AppMySite account, you can design crucial app elements like app icon, splash screen, and so on.
You can design new elements using the features available or upload your own artwork. There is also the option of using stock images from AppMySite’s image library.
Here are the app elements and screens you can design:
- Icon: Upload your own icon design or create one using the tools available. You can see the icon design on the live screen.
- Splash screen: You can upload designs for a logo and background. There are options here to use free stock images too. You can also manage the alignment of your logo or simply add a text message instead of a logo.
- Login & sign-up: It’s the same as designing the login and sign-up screens, with added features to set the color scheme of login fields and buttons.
- Color theme: Set the overall color scheme of all your app screens. The colors you choose will be reflected on all the screens of your app.
- Home screen: Design different sections, add banners, change arrangements, and manage page visibility for your app’s home screen.
You can see how each element and screen looks on the live preview screen. Once you’re happy with the design, proceed to the next step.
Step 2: Connect your store with the app
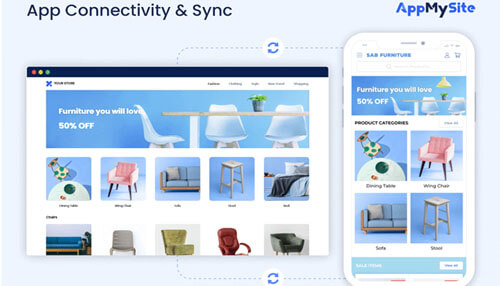
The second step is connecting your WooCommerce store and app. The process would be explained in detail in your AppMySite account.
Put simply, you need to install the AppMySite plugin on your WooCommerce store. Once this is done, generate application passwords on your WordPress site and add them to your AppMySite account.
Connecting your store is necessary for synchronizing your products, categories, and menus to the app. Any updates you make on your online store will be rendered in the app automatically. This includes the addition of new products, price updates, or any other change to the product details.
You can also preview your WooCommerce products in the app in the Preview section. There are both Android and iOS device emulators in this section.
Step 3: Configure your app’s settings
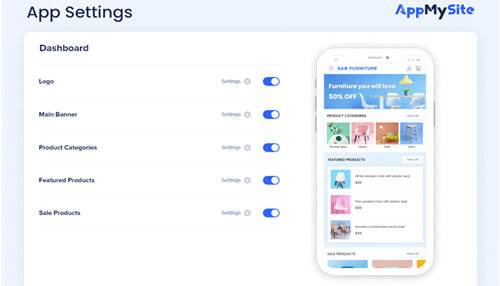
With settings, you can easily manage how your app looks and works.
Here you can manage settings related to your app’s onboarding process, checkout, product display, and more.
Here are the settings you can manage in your app:
- Onboarding: Manage how users log in to your app. You can enable login and allow third-party options like Google and Apple.
- Bottom bar: Show a bottom navigation menu in your ecommerce app.
- Menu: Add a side menu to your app or sync one from your WooCommerce website.
- Checkout: Configure how your customers checkout within the app.
- Products: Control how your app’s products and category screens look. You can enable sort options,
You can also change other settings related to your social handles, pages, posts, and more.
Step 4: Download and publish your app to the app stores
When you’re happy with your app, you can generate your app build, download it, and upload to Google Play and App Store.
While generating a build, you can connect your app to Firebase to enable push notifications and social login in your app. You can also enable appropriate app permissions depending on the webviews you’ve enabled.
Once your build is ready, download it from the iOS & Android app builder and submit it to the app stores from your developer accounts. On AppMySite, you can also use the auto-publish feature, that enables you to automatically push new builds of your iOS app to the Apple App Store.
In conclusion
Launching an e-commerce app is a great way to expand your base of customers. Customers prefer shopping on mobile apps because of their superior performance and better accessibility.
This article lays out how to create a shopping app with a WooCommerce store. You can do this without writing a single line of code and launch your app to to Google Play and App Store in no time.


